PlanSource/Azure™ SAML SSO
Client Configuration Guide
Note:
This page is for reference only and may be outdated. You must work with your Azure Representative for configuration support.
Overview
The following is a client guide for setting up a custom SAML SSO outgoing connection from Azure to PlanSource for the employee enrollment experience.
Background
What are the requirements to setup the SAML SSO connection?
Please verify with your PlanSource account manager or implementation project manager to verify all the following has been done prior to starting the Azure SSO configuration process or if any errors occur with the SSO connection.
- Your client must be fully configured in the PlanSource system.
- Signed off on the SSO contract/paid fees for SSO setup by discussing with your PlanSource account manager and sales
- Each of your employees in PlanSource must have their Azure email stored in the PlanSource API-SSO/Subscriber Code field. This field should be added to the Batch Demographic Import you had setup by PlanSource and the value for each employee would be their Azure email address
- You must have administrator access to Azure to add applications, configure those applications, and assign applications to users
- You must have administrator access to PlanSource and have logged in at least once to the PlanSource administrator page to accept the EULA before any employee can SSO
- Azure must be the only inbound SSO configuration you will be using with PlanSource. PlanSource does not support incoming SSO from multiple vendors at this time
- Azure Active Directory, ability to add new enterprise applications, and the ability to add a new non-gallery application
Disclaimer
This is a PlanSource generated client guide to walk you through the configuration settings of Azure and how to configure this application to connect to PlanSource via SAML SSO as of today (8/4/2018). PlanSource and Azure do not have an official SAML SSO option available by default. This document has been reviewed and tested, but please note that PlanSource is not responsible for changes made to the Azure system, service, or accuracy of the screenshots within this document. PlanSource cannot guarantee that this guide will facilitate a successful SAML SSO connection.
Configuration Details
Connection Information
| Azure Configuration Items | Client Information |
|---|---|
| Identifier (Entity ID): | https://benefits.plansource.com |
| Reply URL: | https://benefits.plansource.com/sso/employee/saml2/post |
| Sign on URL: | Leave blank/empty |
| Relay State: | Client Specific - PlanSource to Provide |
| User Identifier: | user.mail |
| App Federation Metadata URL: | Do not change from what is generated by default |
| Assertion Signature: | Signed |
SAML Token Attribute
| Name | Value | Namespace |
|---|---|---|
| empID | user.email | Blank/empty value |
Steps & Processes
Please ensure all documents relating to this SSO configuration are sent via SECURE EMAIL ONLY!
Install the Necessary Azure Modules & Create a New Application
This section details where to navigate to the ability to setup a new SAML SSO connection.

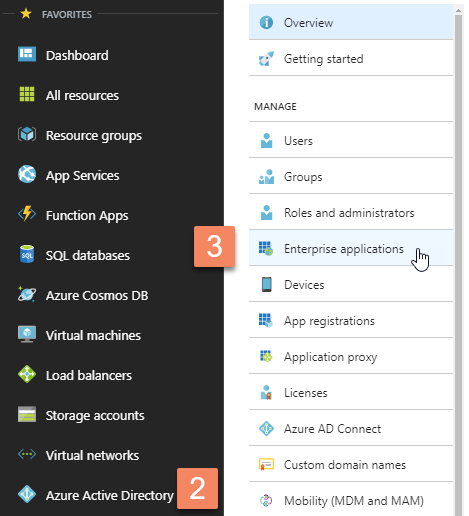
- Access the Azure application as an administrator.
- Navigate to the Azure Active Directory section of Azure.
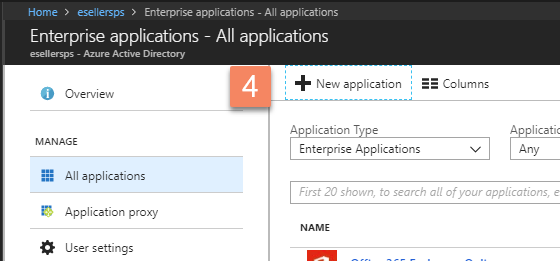
- Access the Enterprise Application section.

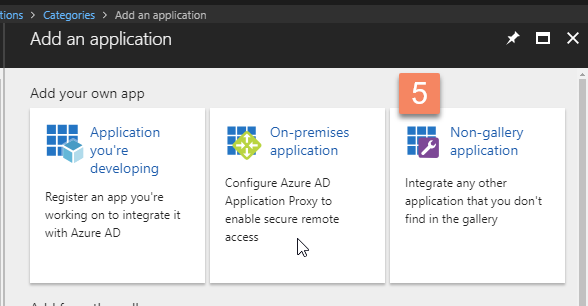
- Add a new application.

- Setup a Non-gallery application.
Single Sign-on Configuration
This section details the configuration page in Azure.
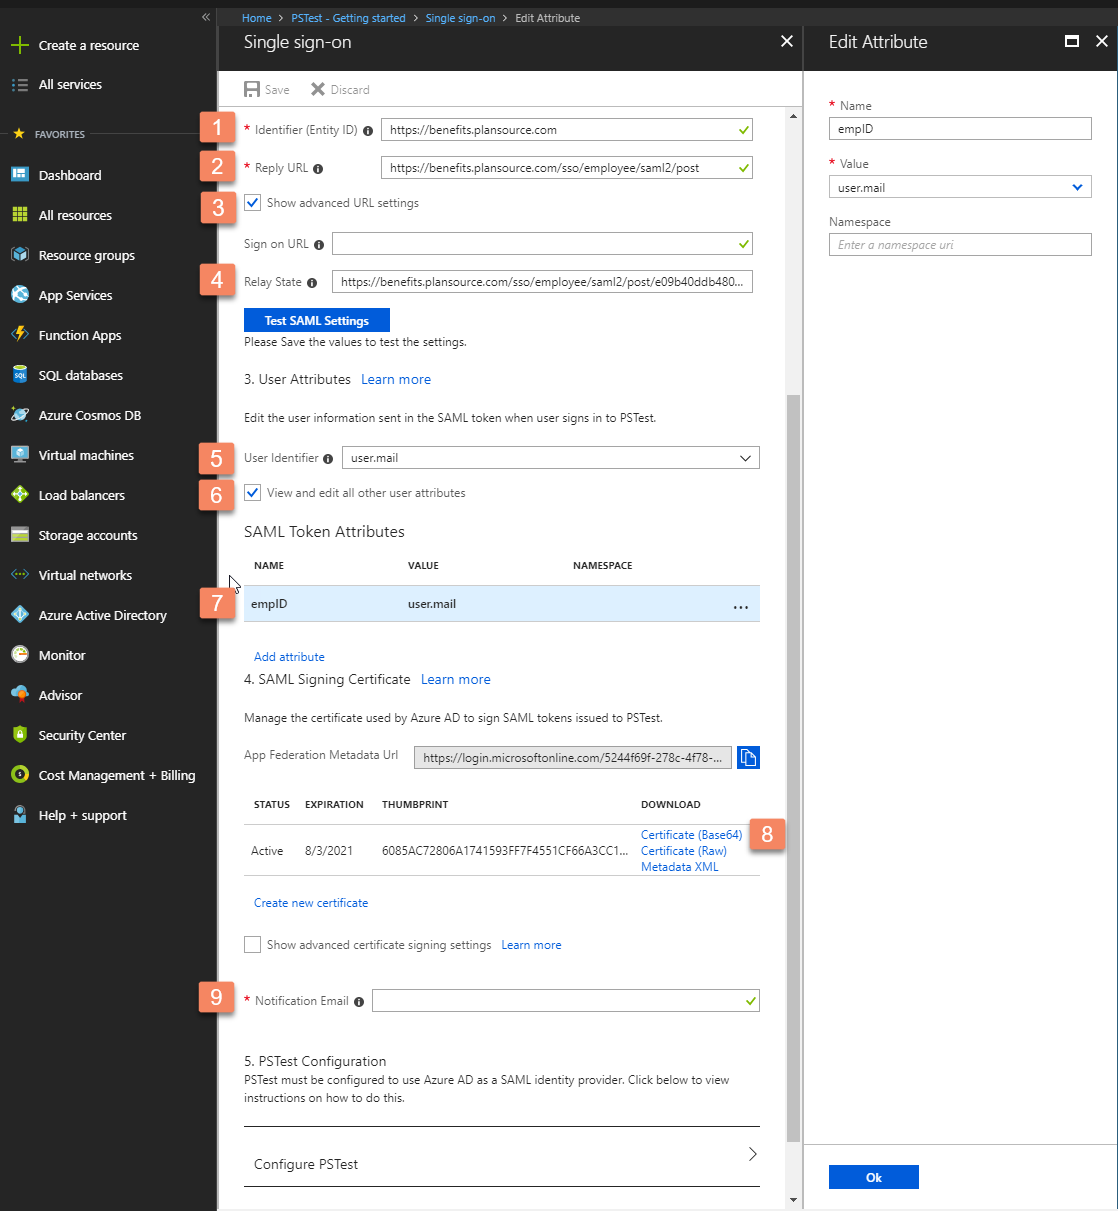
Please use the screenshot on the following page for visual reference. Note that the “Test SAML Settings” feature will not function successfully until PlanSource has also correctly configured SSO.

- Identifier (Entity ID): https://benefits.plansource.com
- Reply URL: https://benefits.plansource.com/sso/employee/saml2/post
- Click the checkbox on “Show advanced URL settings”.
- Relay State: https://benefits.plansource.com/sso/employee/saml2/post/UNIQUE_CLIENT_ID
- PlanSource will provide you your unique client relay state.
- User Identifier: The unique employee value used by PlanSource to identify the employee performing the SSO connection.
- In this example, we are using the Azure user email. This value MUST match what is stored on the employee in their API-SSO Lookup Code.
- Click the checkbox on “View and ddit all other user attributes”.
- Clear all SAML Token Attributes except the attribute you will be sending.
- Name: The Attribute name MUST be set to “empID” as shown (without quotes).
- Value: The value should be the attribute set in step 5. In this example user.mail is the Azure email
- Namespace: This value MUST be blank/cleared out.
- PlanSource must be provided the Certificate (Base64) or Metadata XML file. This contains the certificate needed by PlanSource to validate the SSO request.
- Notification Email: This is a required field that you should populate with the Azure administrator email.
Conclusion
Once PlanSource has configured SSO and employees in PlanSource have had their API-SSO Lookup Code stored. Using the Test SAML Settings should result in a successful connection. If there are still issues occurring, please consult Azure documentation here: https://docs.microsoft.com/en-us/azure/active-directory/active-directory-saas-custom-apps
If you are receiving an error on the SSO attempt, please reach out to your PlanSource account representative.
Updated 3 months ago
